고정 헤더 영역
상세 컨텐츠
본문
Android Basics in Kotlin 강좌의 Unit2: Layout 에서 PATHWAY3 Display a scrollable list 의 RecyclerView를 사용하여 스크롤 가능한 목록 표시 부분을 요약해보았다. 처음으로 이해가 잘 안됐던 챕터였다.
RecyclerView를 사용하여 스크롤 가능한 목록 표시하기 | Android 개발자 | Android Developers
이 Codelab에서는 RecyclerView에 텍스트 목록을 표시하는 앱을 만듭니다.
developer.android.com
1. Recycler View
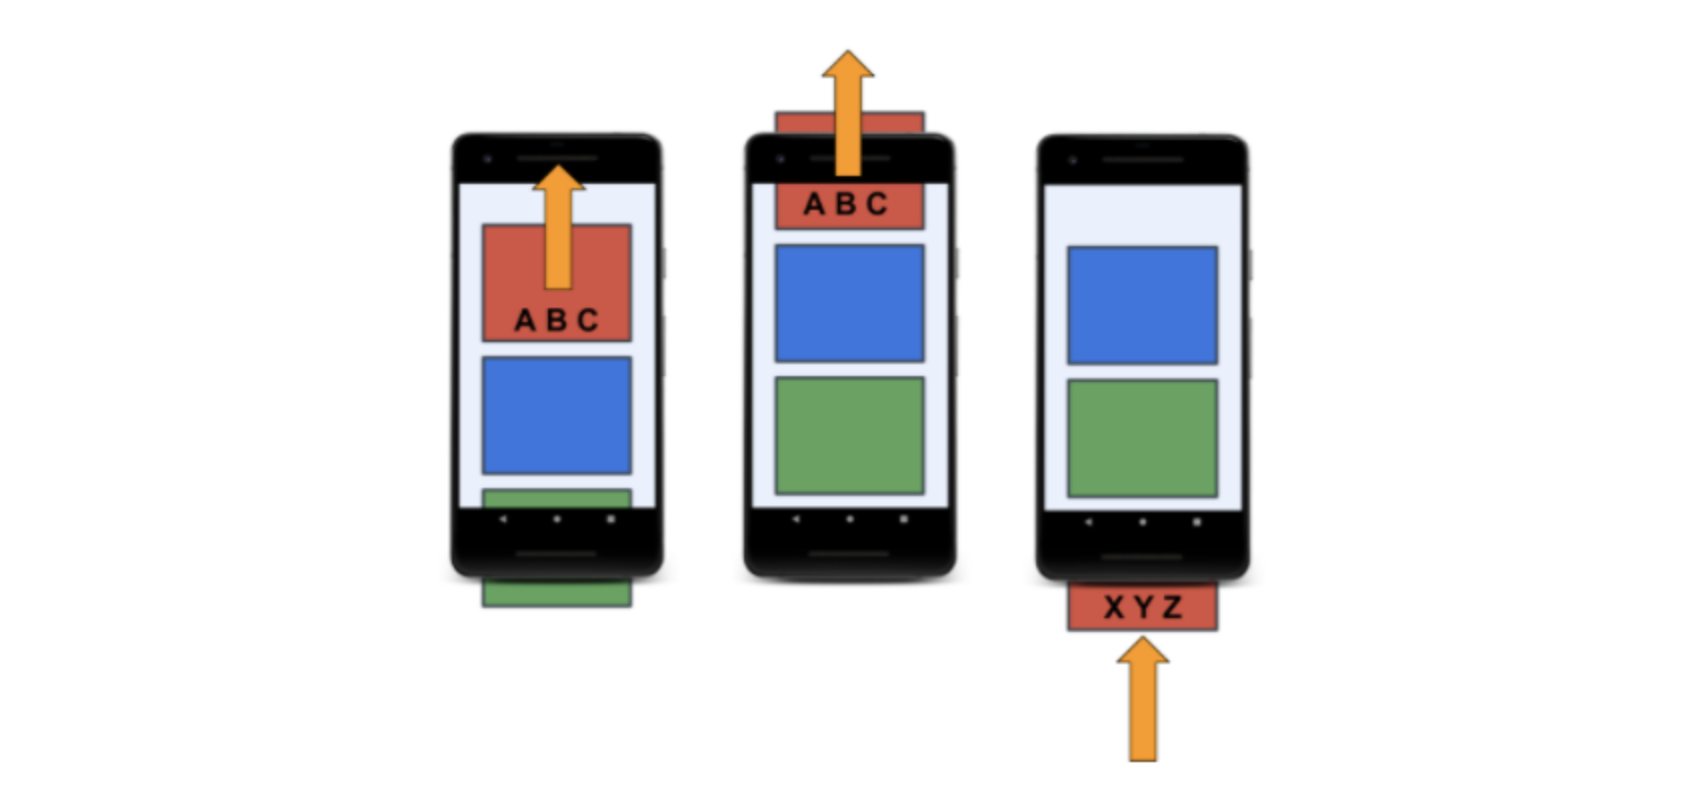
Android는 목록이 있는 앱을 빌드할 수 있도록 RecyclerView를 제공합니다. RecyclerView는 화면에서 스크롤된 뷰를 재사용하거나 재활용하여 목록이 큰 경우에도 매우 효율적으로 작동하도록 설계되었습니다. 화면에서 목록 항목이 스크롤되면 RecyclerView는 표시할 다음 목록 항목에 이 뷰를 재사용합니다. 다시 말해서, 항목이 화면에 스크롤되는 새로운 콘텐츠로 채워집니다. 이 RecyclerView 동작은 처리 시간을 크게 단축하고 목록이 더 원활하게 스크롤되도록 도와줍니다.
한 뷰가 아래의 순서대로 ABC 데이터로 채워진 것을 볼 수 있습니다. 이 뷰가 화면에서 스크롤된 후에는 RecyclerView는 이 뷰를 새 데이터인 XYZ에 재사용합니다.
2. 프로젝트 생성
- app name : Affirmations
3. 프로젝트 구조
1) String value 저장
res>values>strings.xml 에서 affirmation1, affirmation2, ..., affirmation10의 이름으로 10개의 Affirmation string values를 저장한다.
strings.xml
<resources>
    <string name="app_name">Affirmations</string>
    <string name="affirmation1">I am strong.</string>
    <string name="affirmation2">I believe in myself.</string>
    <string name="affirmation3">Each day is a new opportunity to grow and be a better version of myself.</string>
    <string name="affirmation4">Every challenge in my life is an opportunity to learn from.</string>
    <string name="affirmation5">I have so much to be grateful for.</string>
    <string name="affirmation6">Good things are always coming into my life.</string>
    <string name="affirmation7">New opportunities await me at every turn.</string>
    <string name="affirmation8">I have the courage to follow my heart.</string>
    <string name="affirmation9">Things will unfold at precisely the right time.</string>
    <string name="affirmation10">I will be present in all the moments that this day brings.</string>
</resources>
2) Affirmation 클래스 생성
com.example.affirmations.model 패키지를 생성한다.
model 패키지 안에 Affirmation.kt 의 data class를 생성한다.
코드는 다음과 같다.
Affirmation.kt
data class Affirmation(val stringResourceId: Int) {
}
3) Datasource 클래스 생성
다음으로는 com.example.affirmations.data 패키지를 생성하고 그 안에 Datasource.kt 클래스를 만든다.
그 안에 loadAffirmations 함수를 만든다. 이는 listOf<Affirmation> (A1, A2,..., A10)를 반환합니다.
Datasource.kt
package com.example.affirmations.data

import com.example.affirmations.R
import com.example.affirmations.model.Affirmation

class Datasource {

    fun loadAffirmations(): List<Affirmation> {
        return listOf<Affirmation>(
            Affirmation(R.string.affirmation1),
            Affirmation(R.string.affirmation2),
            Affirmation(R.string.affirmation3),
            Affirmation(R.string.affirmation4),
            Affirmation(R.string.affirmation5),
            Affirmation(R.string.affirmation6),
            Affirmation(R.string.affirmation7),
            Affirmation(R.string.affirmation8),
            Affirmation(R.string.affirmation9),
            Affirmation(R.string.affirmation10)
        )
    }
}
여기서 R.string.affirmation1은 strings.xml 에서 name이 affirmation1인 resource의 id값을 가져온다.
또, Affirmation(R.string.affirmation1) 형태의 함수는 Constructor(생성자)로 4번째 줄에서 Affirmation 클래스를 import 했기때문에 id값을 받아서 data를 생성한다.
4) 레이아웃에 RecyclerView 추가하기
현재 activity_main.xml 에 들어있는 ConstraintLayout를 삭제하고 좀 더 간단한 ViewGroup인 FrameLayout으로 교체합니다.
그 후 RecyclerView를 추가합니다.
activity_main.xml
<?xml version="1.0" encoding="utf-8"?>
<FrameLayout xmlns:android="http://schemas.android.com/apk/res/android"
	xmlns:app="http://schemas.android.com/apk/res-auto"
    xmlns:tools="http://shemas.android.com/tools"
    android:layout_width="match_parent"
    android:layout_height="match_parent"
    tools:context=".MainActivity">

    <androidx.recyclerview.widget.RecyclerView
    	android:id="@+id/recycler_view"
        android:layout_width="match_parent"
        android:layout_height="match_parent"
        android:scrollbars="vertical"
        app:layoutManager="LinearLayoutManager" />

</FrameLayout>
5) Adapter 만들기
Create a layout for items
res > layout 에서 list_item.xml 을 생성합니다.
list_item.xml
<?xml version="1.0" encoding="utf-8"?>
<TextView xmlns:android="http://schemas.android.com/apk/res/android"
	android:id="@+id/item_title"
    android:layout_width="wrap_content"
    android:layout_height="wrap_content" />
나중에 이 layout이 확장되어 상위 RecyclerView에 하위 요소로 추가되므로 주위에 ViewGroup이 필요없다.
ItemAdapter 클래스 만들기
ItemAdapter.kt
Affrimation List를 어댑터에 전달할 수 있도록 Constructor에 매개변수를 추가합니다. 또한, ItemAdapter에는 문자열 리소스를 확인하는 방법에 관한 정보가 필요합니다. 이러한 정보와 기타 앱 관련 정보는 ItemAdapter 인스턴스에 전달할 수 있는 Context 객체에 저장됩니다.
import com.example.affirmations.model.Affirmation

class ItemAdapter(priavet val context: Context, private val dataset: List<Affirmation>) {
}
ViewHolder 만들기
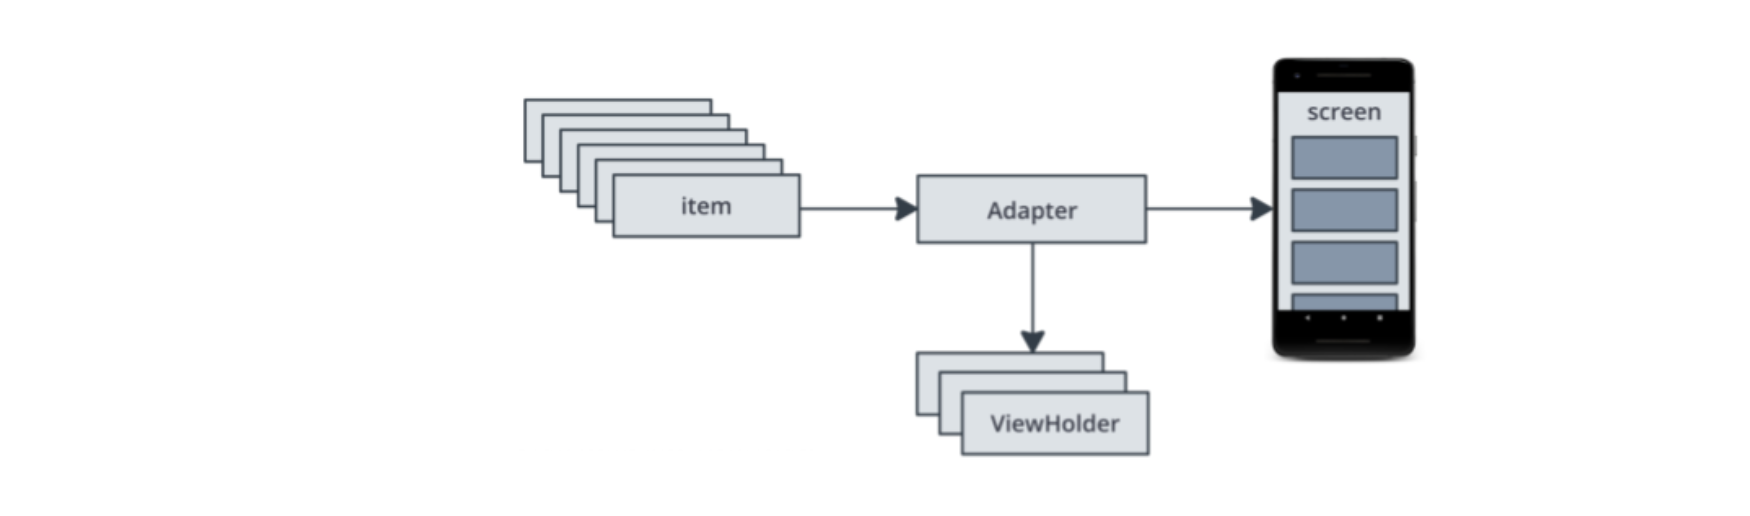
RecyclerView는 Item View와 직접 상호작용하지 않는 대신 ViewHolders를 처리합니다. ViewHolder는 RecyclerView의 단일 목록 항목 뷰를 나타내며 가능한 경우 재사용할 수 있습니다. ViewHolder 인스턴스는 List Item layout 안에 개별 뷰의 참조를 보유합니다. 이렇게 하면 새로운 데이터로 목록 항목 뷰를 더 쉽게 업데이트할 수 있습니다. 뷰 홀더는 RecyclerView가 화면에서 뷰를 효율적으로 이동하기 위해 사용하는 정보도 추가합니다.
ItemAdapter.kt
class ItemAdapter(private val context: Context, private val dataset: List<Affirmation>)
	: RecyclerView.Adapter<ItemAdapter.ItemViewHolder>() {

	class ItemViewHolder(private val view: View) : RecyclerView.ViewHolder(view) {
    	val textView: TextView = view.findViewById(R.id.item_title)
    }

    // 레이아웃 관리자가 새 뷰 홀더를 만들기위해 호출
    override fun onCreateViewHolder(parent: ViewGroup, viewType: Int) {
    	// create a new view
        val adapterLayout = LayoutInflater.from(parent.context)
        	.inflate(R.layout.list_item, parent, false)

        return ItemViewHolder(adapterLayout)
    }

    // 레이아웃 관리자가 list item view 의 콘텐츠를 바꾸기위해 호출
    override fun onBindViewHolder(holder: ItemViewHolder, position: Int) {
    	val item = dataset[position]
        holder.textView.text = context.resources.getString(item.stringResourceId)
    }

    override fun getItemCount() = dataset.size
}
6) RecyclerView를 사용하도록 MainActivity 수정하기
MainActivity.kt
package com.example.affirmations

import android.os.Bundle
import androidx.appcompat.app.AppCompatActivity
import androidx.recyclerview.widget.RecyclerView
import com.example.affirmations.adapter.ItemAdapter
import com.example.affirmations.data.Datasource

class MainActivity : AppCompatActivity() {

    override fun onCreate(savedInstanceState: Bundle?) {
        super.onCreate(savedInstanceState)
        setContentView(R.layout.activity_main)

        // Initialize data
        val myDataset = Datasource().loadAffirmations()

        val recyclerView = findViewById<RecyclerView>(R.id.recycler_view)
        recyclerView.adapter = ItemAdapter(this, myDataset)

        // Use this setting to imporve performance if you know that changes
        // in content do not change the layout size of the RecyclerView
        recyclerView.setHasFixedSize(true)
    }
}
7) 실행 결과

지금까지 안드로이드의 RecyclerView에 대해 알아봤다. 유니티의 object pooling 기법과 굉장히 비슷한 것 같다. 좀 더 연습하면 잘쓸 수 있을 것 같다.
'Tech > Mobile' 카테고리의 다른 글
| [AndroidStudio-Kotlin] View Binding 뷰 바인딩 (0) | 2021.07.13 |
|---|---|
| 안드로이드 스튜디오 TIPS (0) | 2021.07.12 |
| 안드로이드 스튜디오 개발환경설정 (0) | 2021.07.05 |
| [iOS] 뷰의 상태 변화 메서드 (0) | 2021.03.24 |


